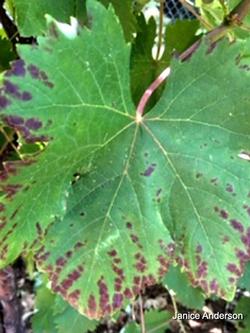
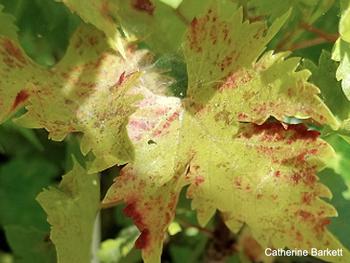
In the vineyard
Quick links
January | February | March | April | May | June
July | August | September/October | November/December
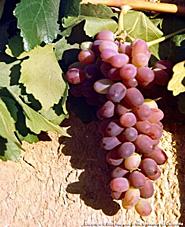
The winter’s chill may have you dreaming about warm weather and luscious, ripe fruit growing in your own backyard.
Grapes are easy to grow and can provide fruit all summer long if you have multiple cultivars (varieties) whose grapes ripen at different times. What you do in the winter and spring months lays the groundwork for healthy grapevines with a good fruit crop.
Grapes - Basic vocabulary
- Arm - an old spur that has become woody and fat over time, usually extending upward from a cordon
- Bud - located at a node on the cane, it produces either a shoot, tendril, leaf or cluster
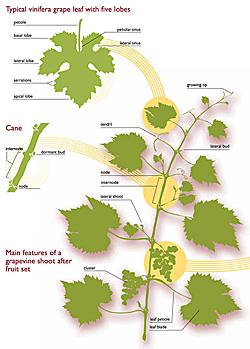
- Cane - a mature, woody shoot
- Cordon - a permanent branch of a vine trained to grow along a wire or on an arbor
- Cultivar - a plant variety that has been produced in cultivation by selective breeding
- Head - the area of a cane-pruned vine from which arms and fruiting canes emerge
- Internode - the portion of a shoot or cane between two nodes
- Node - the point on a shoot or cane where buds emerge and form clusters, tendrils, leaves and lateral shoots
- Shoot - a young cane that has not hardened. Typically a shoot becomes a cane by the time it enters dormancy in the late fall
- Spur - a cane pruned to four or fewer buds
- Tendril - a twining and clinging organ used for support
- Trunk - main stem or body of the vine between the roots and the head or cordons
January
Grapevines are dormant in January and the weather is wet—not a good time to prune. From late fall through early February, rain and wind carry microbes that can enter grapevines through pruning cuts and eventually kill the vines. However, January is a great time for planning. Since all the leaves are off the vines it is easy to see plant structure, making this month the best time to select and mark wood for cutting or keeping when you prune in late February or early March.
Grape clusters grow on shoots from buds that formed the previous year. For best fruit production, you need to remove up to 90 percent of the previous year's growth, but you also want to leave some buds on each vine. The question is, which ones?The answer lies, in part, in where the fruiting zone is on each cultivar. Here is a picture of a grapevine shoot. Each point at which a leaf, cluster or tendril appears is called a node. Mature, woody shoots are called canes. Canes have visible and invisible buds that formed last year at most nodes. These buds will sprout shoots, some of which will have grape clusters this year.
Cultivars differ in terms of where the fruitful buds are. Some cultivars (e.g., Red Flame, Italia, Tokay, Merlot) have their fruitful buds lower on the cane, close to the trunk and/or cordons, on nodes 1, 2 and 3. Other cultivars (e.g., Thompson Seedless, Concord, Suffolk Red) have fruitful buds on nodes 4, 5, 6 and beyond. And a few cultivars (e.g., Summer Royal, Diamond Muscat) have fruitful buds all along the cane.
To accommodate this difference in cultivars, viticulturists have come up with two basic pruning styles (more on both in the February section of this checklist):
- spur pruning, where all fruiting canes are drastically shortened, and
- cane pruning, where fruiting canes are left long.
Have you ever pruned a vine only to get no clusters at all that year? You may have spur pruned a cultivar that needs cane pruning. On a Thompson Seedless, for example, if you cut all the canes short, you have cut off all your fruiting buds!
Here is a good video of Chuck Ingels, former UC Cooperative Extension Farm Advisor for Sacramento County, explaining the difference between the two basic pruning styles.
If you don’t know whether your cultivar should be cane or spur pruned, you can google the cultivar name. If you don’t know the name, cane prune it, then watch to see where the clusters develop. If they develop on shoots that grew close to the trunk, you may spur prune it the next year. But if they grow farther out on the canes, then continue to cane prune.
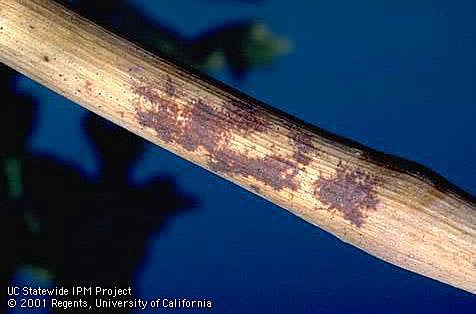
When you examine your cane-pruned vines, look for healthy canes to keep as long, fruiting canes. A healthy cane is around the size of a pencil up to ½ inch thick, at least 10-12 nodes long, free of cracks or breaks, and round. Ideally the cane is headed in the desired direction so that you can tie it to your supports. Canes that are up high in the canopy probably got a lot of sun last year and are often cinnamon in color. They will be more fruitful than canes that were shaded or headed downwards. If possible, avoid any canes with a lot of dark scarring as shown below. The scarring indicates that the vine was infected with powdery mildew last year.
Tag healthy “keeper” canes with colored stretch vinyl ribbon to remind yourself not to prune them off later. Generally, you will select between two and eight canes on the vine to keep long. The final number depends on your available space as well as the vine's age and health. On very young vines, you might just keep one cane on each side of the vine. Don’t make any cuts at this point, just tag the vines. Get help on how to tie vines (PDF) and what kinds of ties to use.
With grapes, you are always thinking about two crops at once: this year’s, and next year’s. For each long cane you keep, you also want to create a renewal spur. Renewal spurs will produce shoots which turn into next year’s canes. To make a renewal spur, select a cane that's high in the canopy and as close as possible to the main trunk. Mark it with a different-colored tape. Renewal spurs are cut back to two to three buds. It is good to preserve an extra renewal spur as insurance.
On spur-pruned vines, look at the spacing. Arms should be spaced about 6 inches apart.
- Are there areas where arms are too close together?
- Are there arms or potential spurs that appear to be damaged or dead?
Your goal is to have one spur on every arm, and every spur will have two to three buds.
- Are there arms with too many potential spurs?
Mark unwanted arms with a different color of vinyl tape for removal in May or June, when the weather is warm and dry and the plant can more easily heal a large cut. In late February or early March you will come back and cut canes to spurs with two buds each.
Other January tasks:
If you have not done so recently and you are using drip irrigation for your vines, check for leaks, and flush your system. You will need to water newly planted vines, but there is no need to water established vines in the winter months, except in a drought. Here is a comprehensive guide for maintenance of micro-irrigation systems.
Look for trellising needs. Order supplies: sprays, netting, rubber ties or vinyl ribbons for trying the shoots to the supports.
Clean and sharpen pruning tools. Here is a good article on why it is important to sterilize your pruning tools (PDF).
January is a suitable month to plant new vines if the ground has not frozen and is not too wet. You should be able to find bare root grape plants in nurseries, or you can order them online. You can also order cuttings and propagate them at this time. Order from a reputable grower. One excellent local source for cuttings is the Foundation Plant Services at UC Davis. They have links to other certified growers in California.
Here are links with basic information about the care of young vines:
Growing Grapes, Care of Young Pants (PDF)
Growing Grapes in Your Backyard
Guidelines for the Home Vineyard (PDF)
February
Grapevines need to be pruned each year. Pruning enhances sunlight and airflow within the fruiting zone, which improves this year’s fruit quality and inhibits some disease. Improved light exposure also ensures that buds forming on this year’s shoots will be fruitful next year. Pruning removes dead, damaged, unfruitful, and otherwise undesirable wood--for instance, canes that are growing in the wrong direction or that crowd other canes. If you don’t prune, it won’t take long for your vines to creep into your neighbor’s trees!
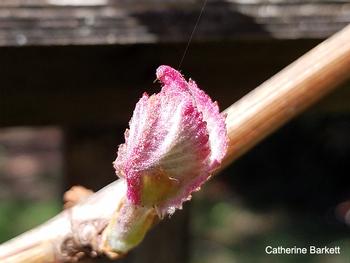
Late February is usually a good time for homeowners to start pruning grapes because the vines are resuming active growth, as indicated by bud swell. A dormant bud nearing bud break will begin to enlarge like the picture on the right below.
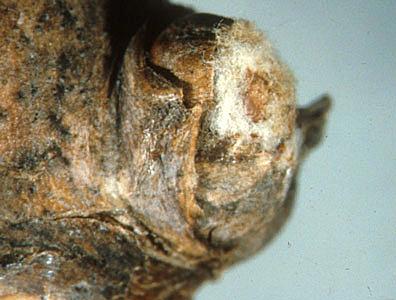
Dormant bud
|
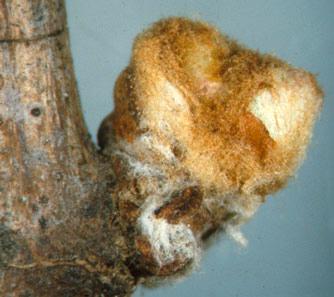
Dormant bud swell
|
This is appropriately termed bud swell. The inner bud is enlarging and will soon break free from its protective bud scales.
An ideal pruning day is dry and is followed by at least two days with no predicted rain. Pathogens, or disease-causing microbes, are carried by wind and rain and can enter vines through wounds left by pruning. By waiting for a dry period, you give the wounds time to heal before the next rain. If you cannot prune in late February due to rain, it is OK to prune in early to mid-March, before the emerging shoots reach 2 inches long. However, earlier is better to avoid inadvertent shoot breakage during pruning.
There are two basic types of dormant grapevine pruning for mature (fruiting) grapevines, spur pruning and cane pruning. Which one you use depends on the location of fruitful buds on each cultivar. Our notes for the month of January provide additional details and a link to a video on pruning.
Cane Pruning
Some grape varieties (cultivars) don’t produce fruit from buds formed close to the cane’s base. They produce clusters from buds farther out on the cane - on nodes 3, 4, 5, and 6, for example. These cultivars should not be spur pruned. To cane prune a mature vine, select from two to eight one-year-old canes (depending on available space and the vine’s age) that got good sunlight the previous season. These canes tend to have a cinnamon color.
Good canes for keeping are around the size of a pencil up to ½ inch thick. They will be woody but won’t have a lot of bark. They will be long and ideally have nodes that are fairly close together. They will be headed in the right direction, allowing them to be tied to your supports without risk of breakage. Undesirable canes are those that are too vigorous (over ¾” thick, with internodes measuring 5 to7 inches or more, and somewhat oval in shape), too thin or too short, broken, or badly damaged by powdery mildew. See January notes above for a picture.
Once you have selected the canes you want to keep, tie them to your supports with stretchy vinyl ribbon or rubber ties and cut them to approximately 12 to 14 buds long. Depending on how much room you have, you might leave them longer or cut them a little shorter. It is a good idea to tie down your “keeper canes” before making any cuts, because sometimes as you are tying the cane to a support, the cane snaps off or cracks, making it undesirable. If you have already cut off all the canes you don’t want to keep, you are left without a second choice.
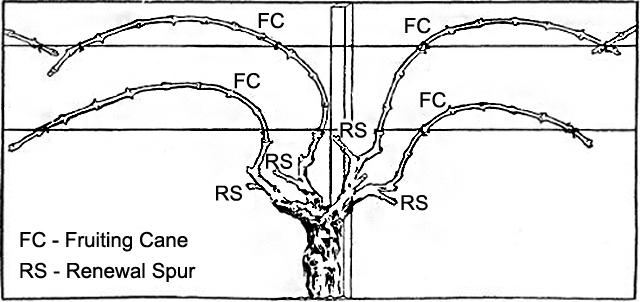
For each long “fruiting“ cane (noted on the illustration below with FC), select a second cane for a renewal spur (marked as RS below). Cut this cane to a spur with two or three buds. This spur should produce shoots this year, and some of those shoots will be fruiting canes for the following year. It is helpful to protect the shoots that come from this spur by tying them to supports so that they do not get trimmed too short or become shaded out by other growth. It is also wise to leave an extra renewal spur as a backup.
Cut all the other canes back to where they emerge from the trunk. Also remove any suckers emerging below the head of the vine or from underground.
Your cane-pruned vine should look something like this.
Spur Pruning
Cultivars that produce fruit on shoots from the base of the cane should be spur pruned. When spur pruning a mature vine occupying about 8 linear feet, as a general rule you are aiming for about 14 spurs per vine (seven on each side), and two fruitful shoots per spur, each with one cluster, for a total of about 28 clusters per vine. This is just a rule of thumb that should be modified depending on how much room and what kind of trellising you have, and the age and health of your vine.
Canes that are dead, broken, crowded or headed off in the wrong direction are cut off completely. However, any cuts larger than a nickel should be made later (in May or June), when the plant is actively growing and can close the wound more quickly. Identify those future cuts with a colored ribbon so that you can find them even after the canopy has leafed out. Smaller cuts may be made now, provided the weather is dry on pruning day and for a few days afterward.
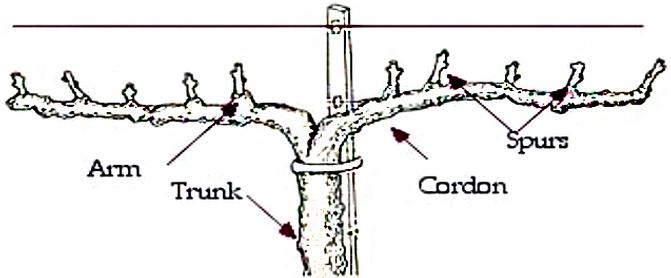
Cut one cane on each arm to a two-bud spur and eliminate all other canes on that arm. When you count the buds, however, don’t count any bud that is within ¼ inch of where the cane emerges from older wood. Such buds are usually not fruitful and are called “non-count” buds. So bud #1 will be the next bud further out. Cut after bud #2 at a slight angle so that rain and sap coming from the cut run off to the ground. Cut canes normally drip sap for days after pruning; this is not harmful to the plant. This is also a good time to cut unwanted canes that emerge from the vine trunk or from underground.
Your spur-pruned vine will look something like this:
You may have noticed the frequent mentions here of mature vines. Vines under three years of age require special pruning. For more information, see Growing Grapes, Care of Young Plants (PDF).
Other February tasks:
Weed around the vines in the walkways and clean up any grapevine debris. Natural mulch (e.g., wood chips) may be applied now or at any time, taking care to keep chips at least 6 inches from the vine trunk on all sides. It cuts down on weeds and will gradually break down, providing nutrients to the vine.
This would also be a good time to set up deer fencing, if deer are a problem. Deer love to nibble on the tender buds that will open in March, as well as the shoots that follow.
March
In March, buds on your grapevines will begin to swell, burst, and sprout leaves and shoots. If you did not prune in late February, prune in March before the new shoots reach two inches long.
Select a dry day for pruning, with a weather forecast for at least a couple of dry days after you prune. Pathogens travel on wind and rain, and can infect vines through pruning cuts; that is why it is important to prune in dry weather. For detailed instructions on how to prune, see the notes above for both January and February.
Look carefully at the buds on your vines. The buds you see in early March formed last year, and then went into dormancy for the winter period. Dormancy protects grapevines from winter frost. As the weather warms up, the vines start to grow again and the buds will begin to swell.
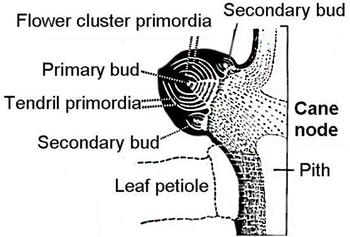
Grapevine buds pack a whole lot of potential into a tiny space. Each bud is actually a cluster of buds: a primary bud, and one or more secondary buds. If the primary bud becomes damaged, for example, by hail or a hungry critter, the secondary bud takes over and will usually push out a shoot. Be very protective of your buds and new shoots, however, especially as you prune, because shoots from secondary buds are not as fruitful as shoots from primary buds.
In this drawing you can see not only the primary and secondary buds, but also, inside the primary bud, the beginnings of a cluster and a tendril (primordia).
March is the perfect month to plan sprays for pests in your vineyard. The most widespread disease for grapes in Sacramento is powdery mildew—a fungus that damages grape vines and fruit. In table grapes it can reduce the rate of photosynthesis, which can reduce the plant vigor and resilience.
Worst of all, it also hampers the ability of berry skins to expand as the berries grow. The skins crack and scar. In many cases the berries do not ripen at all, in others the cracking allows pathogens to introduce rots that destroy clusters.
The first and second photos below show powdery mildew colonies on grape leaves and berries. They appear as a white dusty web. In both cases, the colonies are producing spores that will launch the infection cycle anew.
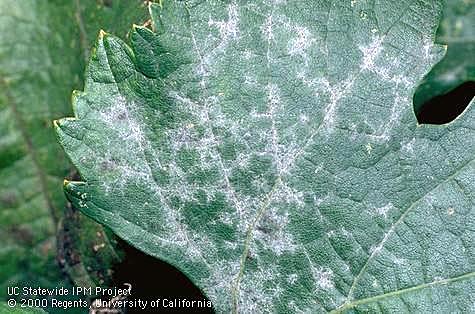
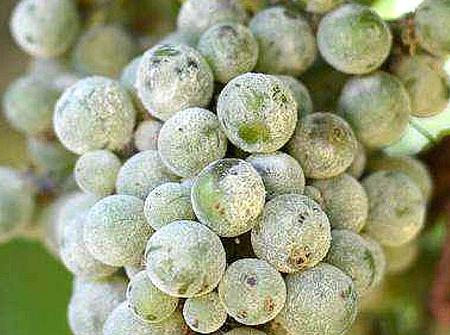
Powdery mildew flourishes in mild summers. Spores grow between about 60 and 85 degrees F, with 77 degrees being the optimal temperature for growth. After three days in a row with at least 6 continuous hours between 70 and 85 degrees F, epidemic conditions can be assumed to exist.
Powdery mildew is so common in Sacramento that you should be ready to start your prevention and treatment program at bud break. We recommend the use of organically approved fungicides for powdery mildew control. Homeowners may spray sulfur at budbreak as a preventive/eradicant measure and later switch to another organically approved product once temperatures are consistently above 70 deg F. Examples are neem oil and highly refined paraffinic oil, which can be found in local nurseries or online. In addition to suffocating and killing mildew spores, oils also help control other common grapevine pests.
Whatever fungicide you use, always follow label instructions, particularly recommendations on appropriate spray temperatures and intervals between oil and sulfur products.
Often growers will spray for powdery mildew with a sulfur spray as a preventative and then switch to an oil or another approved product once the powdery mildew appears. Oils such as Neem Oil and JMS Stylet Oil can be found in nurseries or on line. They are organic suffocants: they coat and suffocate the spores, which kills them. They also provide some protection against grape leafhoppers—another common pest of grapevines.
Whatever you choose, always follow the instructions label and never mix sulfur and oil or use them within two weeks of each other. The combination could kill your vines. Keep spraying according to the time intervals on the instructions, until the daytime temperatures reach 95 degrees for at least 12 hours during the day. If the temperatures drop back down before you have harvested, resume the spray program.
For a list of approved pesticides for powdery mildew, and more details, see the UC Pest Management Guidelines for Powdery Mildew.
April
April in a healthy vineyard is a time of rapid growth. Management of vines at this time is critical to establishing good canopies. Tasks for April include:
- tie shoots to their supports
- irrigate
- remove suckers
- weed
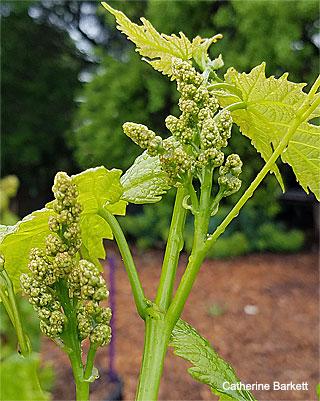
Buds swell in March, and then burst with new leaves in late March or early April. Shoots, leaves, tendrils, and flower clusters begin to appear. A fruitful shoot will produce one to three inflorescences (flower clusters), depending on the cultivar and the conditions under which the buds developed the previous year. An inflorescence has many buds, each of which will become an individual flower and, if fertilized, a grape berry.
Most grape species are self-fertile, so it is not necessary to grow more than one vine to get fruit. Flowering usually occurs in May in the Sacramento area, so we’ll talk about flowering in next month’s notes.
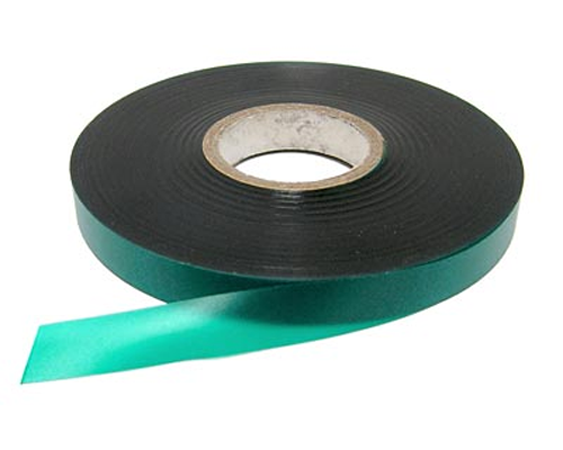
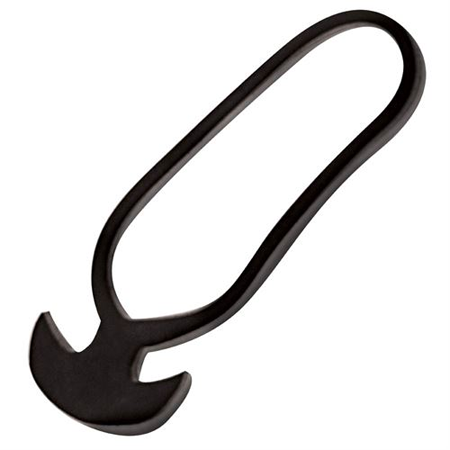
As shoots begin to grow longer, secure the shoots to your supports with stretchy ties. Vinyl ribbons and rubber-band vineyard ties are good choices. Don't tie them too tightly; you want to keep the shoots from whipping around in the wind, but you don't want to constrict their growth (i.e. "girdle" them).
|
|
In April you may start thinning shoots lightly. For instance, remove shoots that are emerging from the bottoms of cordons. You may find two or more shoots growing from a single node. If one has an inflorescence and the other doesn’t, remove the shoot without the inflorescence. Otherwise, remove the smaller shoot(s).
At this time, you can also remove suckers, i.e., shoots growing from the trunk below the vine head. Green growth like this is easily snapped off with your fingers. Shoot removal does wound the vine, so avoid removing shoots or suckers in the rain. Please see May notes for a more complete discussion of canopy management.
We are frequently asked how, how often, and how long to water. Drip irrigation is the preferred watering method for grapes because by delivering water directly to roots, it reduces water waste and the potential for plant disease. If you have no option but to use landscape sprinklers, adjust the sprays so that water does not hit foliage and fruit.
A grapevine's moisture needs depend on several factors, including vine age, soil type, weather conditions, and time of year. In late fall and winter, moisture stored in the soil combined with rainfall generally provide enough water for dormant table grapes. At bud break, which usually occurs in the Sacramento region in late February, a vine's need for water begins to rise. The need for supplemental irrigation in our area usually starts in April with canopy expansion, peaks in July, and continues into fall as long as there is no rain and green leaves remain on the vine.
A mature, trellised vine in full Central Valley sun can consume up to 10 gallons of water per day, a little less in our area. Young, untrellised, and partially shaded vines consume less still. At summer’s peak in the Fair Oaks Horticulture Center, we water our vines four days a week, about three hours at a time, using a drip irrigation system that supplies roughly four gallons of water per plant per hour.
Table grapes, unlike wine grapes, cannot tolerate water deficits and should be watered deeply at least twice a week, particularly between fruit set and berry softening. Recently planted grapevines usually need water several times a week. Inadequate water leads to failure to thrive, reduced berry size, and, in extreme cases, defoliation. Too much water encourages excessive canopy growth and makes disease management more difficult.
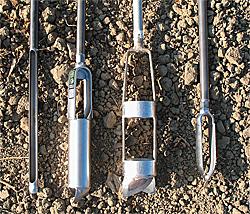
There are several ways to evaluate soil moisture. You can dig holes 12-18 inches deep and check soil moisture at the bottom of the holes. Scrape up a fistful of soil and squeeze it into a ball. If the ball is muddy, or clumps together like modeling clay, you are watering too much. Soil at that depth should be damp but not wet. Less disruptive to roots than digging is a soil sampling probe. This tool is pushed 12 to 18 inches into the soil and pulled back out, bringing a core sample you can check for moisture. Water should penetrate at least to that depth to encourage deeper root growth.If digging is difficult and a sampling probe is not in your budget, plant appearance does provide feedback on watering:
- Actively growing shoots on well-watered vines have tendrils that stretch beyond the end of the shoot. When plants are water stressed over a period of time, tendrils are short, eventually dry up, and fall off.
- On an extremely hot day in Sacramento, leaves may droop in the afternoon because they are losing water to the atmosphere faster than the plant can pull moisture from the soil. Leaves should perk up after sundown if soil moisture is adequate. Leaves that remain limp may be signaling a lack of soil moisture. Where possible, irrigate ahead of a predicted heat wave to protect foliage and fruit.
- Another sign of sustained water stress is fruit sunscald, yellowing of older leaves, and leaf scorch as early as late June.
A grapevine suffering from severe water stress, among other problems:
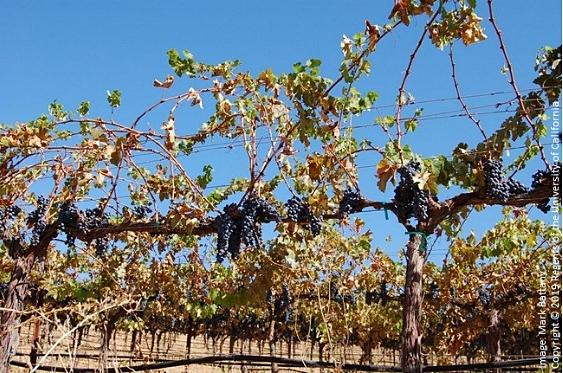
Also in April, continue your powdery mildew spray program, and weed, weed, weed! Weeds grow prolifically in April, and they compete with grapes for nutrients. Once you clear the area around the trunk from weeds, consider mulching with wood chips, taking care to keep chips at least 6 inches from the vine trunk on all sides. Mulch will cut down on weeds, and eventually break down to provide nutrients to the soil.
May
Bloom, Canopy Management, and Disease Control (Powdery Mildew)
Bloom
Grapevines in the Sacramento valley usually bloom in early May. Grape flowers contain both male and female parts, so a single vine can produce fruit. Flower clusters are called “inflorescences”, and if conditions for their formation existed the previous year, they are readily visible on recently emerged shoots. Shoots with inflorescences are described as “fruitful”.
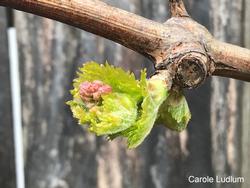
Just before bloom, inflorescences look like a collection of tiny green balls. Each ball is actually a flower bud. During bloom, the green petals that enclose the rest of the flower (“calyptras”) drop off and the stamen push upward, transferring pollen to the female part of the flower. Wind also carries pollen a short distance. Here is a picture of a cluster in bloom. The calyptras have dropped off and the light yellow stamens are visible to the naked eye.
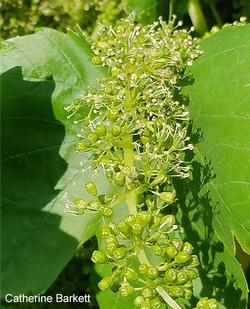
Fertilized flowers will set, if all goes well, and become grapes. Hail, heavy rain or wind, varietal differences, and disease can all cause poor fruit set, as can heavy-handed human pruners! Be careful around the inflorescences; just brushing against them can break off flowers. Soon after pollination, unset berries will “shatter” or fall off on their own.
Canopy Management
Blooming isn’t the only event to watch out for in May. The shoots and leaves that start growing in earnest this month are important, not only because they support fruit, but also because the nutrients they generate will return to the trunk and roots at the end of the season to support next year’s crop. That does not mean that a grapevine should be allowed to run rampant. On the contrary, by controlling canopy growth you can achieve a good crop of grapes this year, and a healthy vine that enters the dormant period with enough nutrients to produce a good crop next year.
That’s right: when growing grapes you are always thinking about two crops at the same time, this year’s and next year’s. This year’s crop developed within buds that formed on last year’s canes. In fact, if you were to dissect buds from last year’s sunlit canes and examine them under a microscope, you would see tiny, undeveloped inflorescences. Next year’s crop will develop in buds forming this year. So the goal is to create vine conditions that promote healthy fruiting both now and in the future. Canopy management practices are a critical way to achieve this goal.
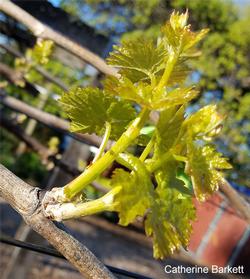
Earlier we mentioned that we aim for 28 fruitful shoots on our mature, spur-pruned vines, for a total of about 28 clusters. Sometimes a vine produces multiple fruitful shoots on one spur and on another, only unfruitful shoots. In that case, we leave one of the unfruitful shoots and two fruitful shoots. Another metric we aim for is shoots per linear foot. On a spur-pruned vine, the optimal number of shoots per linear foot is about five. On a mature, cane-pruned vine, we aim for about six or seven canes total.
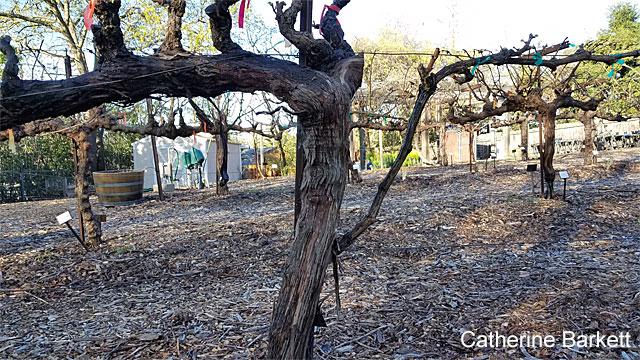
Downward-facing shoots, shoots that emerge from the head region, from non-count buds, and from the trunk are also candidates for removal. An exception is a shoot that could replace a dead spur, or a cordon lost due to a mechanical injury or trunk disease. In that case you might want to leave a shoot emerging from the trunk to grow out as a replacement. This is a picture of a Diamond Muscat on which a cordon was removed because it had Eutypa. A shoot that emerged from the trunk post-surgery was trained as the the replacement cordon on the right.
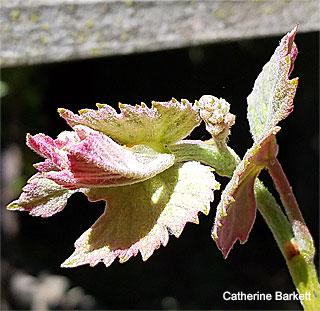
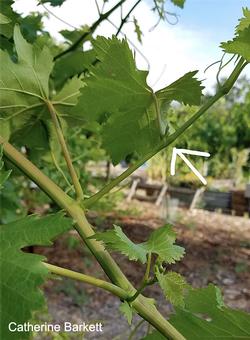
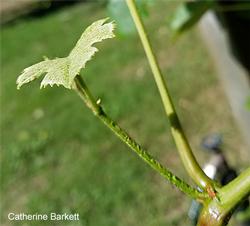
In late May you can also start watching for the formation of lateral shoots, i.e. shoots that emerge from where leaves attach to the shoot. On the picture below, the shoot on the left is a lateral shoot.
It is a good idea to remove laterals unless they are needed on the sunnier side of your vine to shade clusters. As a general rule, remove less foliage on the side of a vine that gets the hot afternoon sun.
Disease Control
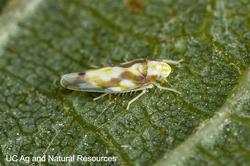
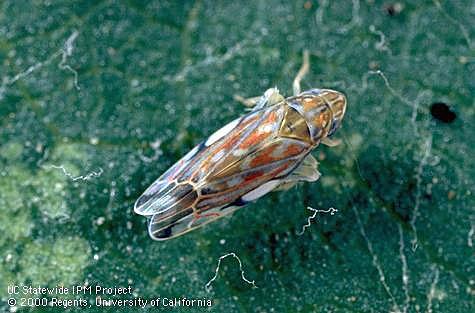
May also offers perfect conditions for powdery mildew to run rampant in grapevines. As mentioned in our April notes, when temperatures rise into the 70’s and stay below 85 degrees F for 6 consecutive hours, 3 days in a row, plant disease experts consider a powdery mildew epidemic to be in place and recommend a regular spray program. Oil-based products like neem oil and all-season horticultural oils provide control as long as coverage is good and application frequency follows label instructions. Oils also help control a major nuisance pest of local grapevines, grape leafhoppers. These tiny, light-colored insects flutter from the canopy when disturbed and are often confused with whiteflies.
June
Grapevine canopy growth is at its most rampant in June. The bloom period is largely past, so with fruit set comes the need to start leaf and lateral removal and to adjust the crop. Shoot positioning and tipping are essential to keep the placement of the shoots and their length under control, and to ensure that the fruiting zone gets enough sun for this year and next. These tasks (along with shoot removal, which was discussed in May) are referred to collectively as canopy management practices. They help maintain a balance between fruit production and leaf/shoot growth, reduce the risk of disease, and improve spray penetration into the canopy.
June is also a month when home gardeners start noticing insects on their vines. Spraying to control powdery mildew, and increasing and monitoring irrigation round out the most important tasks for June.
Canopy Management
Leaf removal, also called leaf pulling, consists of pulling off the leaves that are growing in and around clusters. Light and air around the clusters promote healthy grapes and discourage mildews, rots, and pests from attacking the clusters. Many gardeners remove leaves only on the side of the vine that gets morning sun (the east side). Be very careful about pulling leaves on the side of the vine that gets the afternoon sun (the west side) because sometimes those leaves are needed to provide shade. Morning sun, filtered sun and dappled shade are all good for table grape clusters, but direct afternoon sun causes sunscald.
If your vine canopy is quite open, consider using shade cloth, or filmy white fabric, to protect the clusters this month and next. If you have a very dense canopy, remove lateral shoots, i.e. side shoots that emerge from the same node as a leaf. In the photo, the long green shoot that heads up to the right-hand corner of the picture, is a side shoot.We are often asked how long to leave shoots. Clearly you do not want them trailing on the ground. On the other hand, a cluster needs 12 to 15 leaves to ripen properly. On the eastern (morning sun) side of the vine, cut the shoots about waist high. On the sun with afternoon sun (west side), cut the canes at knee length, again, trying to maintain at least 12 leaves on the shoot. If space restrictions, cane breakage, or pruning mistakes leave you with a shoot with fewer than 12 leaves, allow laterals to grow to compensate.
As you are removing some shoots and tipping others, position the remaining shoots so that they are spread out from each other, taking up the available space, and use flexible ties or tape to tie them to your supports. (See April for pictures of ties.) This will promote light penetration into the canopy and keep the shoots from shading one another.
Once fruit set has occurred, and fruit shatter is past, adjust each vine's crop load so that it is carrying a volume of fruit that it can successfully mature. A rule of thumb is to leave one cluster per cane. Remove smaller, weaker-looking clusters, those with poor fruit set, overly large clusters, or those growing too close to each other.
For young vines, which tend to overbear their first year in production (generally at three years of age), reduce this even further, leaving few clusters on the vine. Young vines become healthy older vines when they develop strong roots and trunks in their early years. Nutrients in the fruit could have gone into building up the permanent structure of the vine. Allowing young vines to overproduce can permanently weaken them.
Spray for powdery mildew
It is also essential to continue your spray program this month when temperatures are between 70 and 85 degrees for at least three hours each day. Spray as often as the label on your product suggests, at the recommended concentration. Pay attention to the temperature guidelines on the label; spraying oils or sulfur on hot sunny days can damage tender plant tissues.
Irrigation
Water thoroughly before predicted heat waves. Grapes do best with two to three waterings per week, time period dependent upon how much water your irrigation delivers each hour. Use a soil probe or dig down about a foot next to a vine and if the soil is dry, increase watering. Newly planted vines require more frequent watering than mature vines. It is not uncommon for vines to wilt slightly on hot days. If your vines do not perk up overnight, increase watering length or frequency. Table grapes are not a drought-tolerant crop.
Arthropods in the vineyard - friends or foes?
Here are vine denizens most commonly seen in our area and the part they play in the vineyard.
| Grape leafhoppers Grape leafhoppers are often confused with whiteflies. The nymphs drain cell contents and produced a stippled appearance, especially on older leaves. Multiple generations are produced during the growing season and a large population can defoliate a vineyard. Oils used for powdery mildew usually control them. |
|
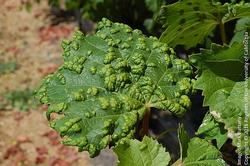
| Erineum mites These mites cause bright pink, red or green bumpy swellings on upper surfaces of leaves. Luckily, the damage they do is cosmetic and they tend to disappear in late summer. |
|
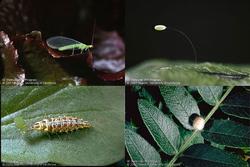
| Lacewings This is a beneficial insect whose young prey on pest insects.
|
|
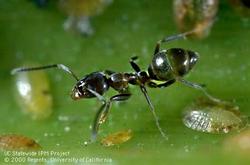
| Argentine ants Argentine ants are common in dry mulch and are known to "farm" aphids, mealybugs and scale insects for their honeydew. |
|
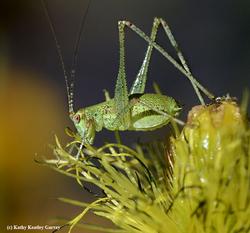
| Katydids Katydids resemble grasshoppers. The juveniles can inflict significant damage on young vines, but usually do not require control. |
|
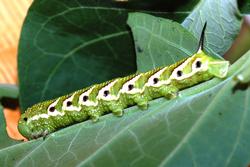
| Hornworm Hornworms are voracious feeders. |
|
| The three insects below are significant problems. If you see them, please notify our office by sending a photo to our e-mail: mgsacramento@ucanr.edu. or catch and place in a plastic bag and take to your local county Agricultural Commissioner's office. |
|
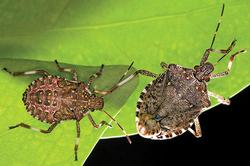
| Brown marmorated stink bug Most stinkbugs on grapes are not particularly harmful. However, the brown marmorated stink bug is an invasive pest. This publication explains how to tell the difference between stinkbugs, and what to do if you see one. |
|
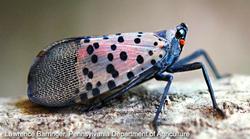
| Spotted lanternfly The spotted lanternfly originated in China and has been found on the east coast of the United States. It has done serious damage to grapevines and also feeds on many fruit trees and ornamentals. As of June, 2020, it has only been found dead, on planes, on the west coast. Growers are on alert to spot and report live spotted lanternflys to help arrest their spread. |
|
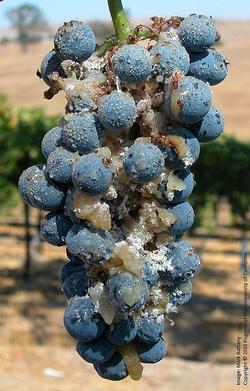
| Vine mealybugs Vine mealybugs are a significant grapevine pest. Mealybugs contaminate grape clusters with cottony eggsacs, lavae, adults, and honeydew. Ants are attracted to the honeydew so you may notice the ants on your grapevines before you notice the mealybugs. The honeydew is often infested with black sooty mold . Leaves turn red, the leaf margins curl, the plant loses vigor, and eventually, its leaves. Fruit maturity and quality are reduced. Mealybugs can also transmit disease-causing viruses to grapevines. If you find mealybugs in your vineyard, collect the largest mealybugs you can find and place them in a jar of alcohol or sealed plastic bag. Take the sample to your county Agricultural Commissioner. Read more (PDF). |
|
July
Canopy management
Continue to manage your canopy using the techniques described in June. Laterals grow/regrow quickly and require constant attention.
Irrigation
July in the Sacramento area is usually quite hot, so increase irrigation and monitor your vines closely. If your vines wilt in the afternoon, it may be because they can’t take up water fast enough from the soil to replace what they are losing through transpiration. But if they wilt in the day and do not perk up at night, they probably need more water.
Deep watering is preferred to shallow because it encourages roots to grow deep, where they are more likely to find moisture in hot weather. Water should penetrate at least 18 inches into the soil. If you experience water running off the ground before it soaks in, “cycle” watering; i.e. set each station to the point at which you get run-ff, then switch to the next station. After watering all stations, repeat the cycle until water penetrates to 18 inches. Some timers can be set to do this automatically.
Fruit protection
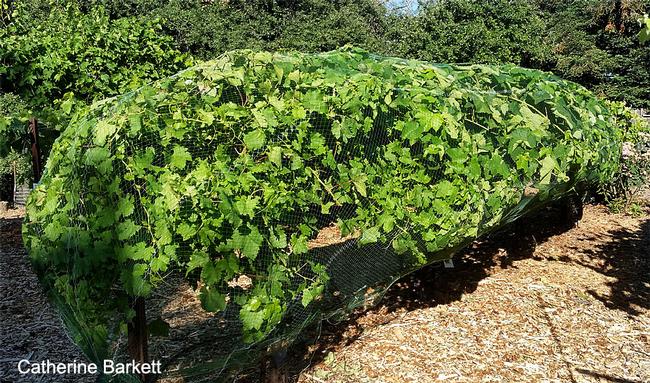
Birds and other critters can be a huge problem as the grapes begin to ripen. A small flock of turkeys can strip vines overnight. Robins, starlings and finches are common pests. There are several kinds of netting available at vineyard supply stores. Some netting covers the whole vine, or whole row of vines, and when pinned underneath or pinned to the ground, it can provide an effective barrier. Other netting is designed to protect both sides of the vine, but the top is open. And, if you only have one or a few vines, you can try putting organza mesh bags around individual clusters.
At the Fair Oaks Horticulture Center we look for netting with the following qualities:
- Mesh no larger than ¾” by ¾” - small enough to keep out almost everything with wings and a beak;
- Wide enough to drape over the entire row and meet at the bottom and ends of the row, so that it can be pinned together at the bottom, keeping birds and other critters from coming in at the bottom. Most netting comes in a variety of widths;
- Relatively easy to put on and take off. Some netting has a sticky feel to it and is hard to move around. Other netting has a slick feel and is much easier to maneuver;
- Sturdy enough to last multiple years (e.g., UV-protected).
To provide a complete barrier, you will need to drape the netting over the top of the vine and clip the edges together at the sides and bottom. There are several types of clips available. You might try a combination of clips, placing them about three inches apart so that there are no openings large enough for a bird to squeeze through.
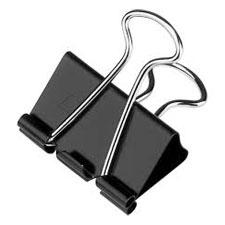
Binder clip
|
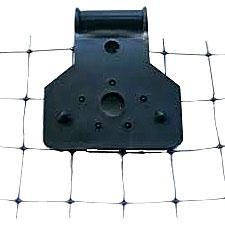
Butterfly clip
|
- Binder clips. These are easy to put on and remove.
- Butterfly clips. These are difficult to remove. You need a screwdriver or other tool to pop the clip open when you are ready to remove it. However, they are effective, and if human predators are helping themselves to your grapes, these excel because of the effort it takes to remove them. Available at any vineyard supply store.
For information about other pests and what to do about them, see Vertebrate Pest Management for Grapes (PDF).
If deer are a pest in your garden, see: Deer Pest Management Guidelines.
August
August is a month for grape growers to start enjoying and preserving their grape harvest. Many of Sacramento's most popular grape cultivars ripen in August.
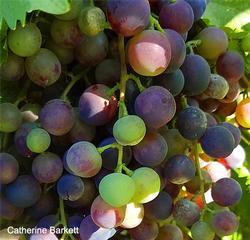
Veraison, or the onset of ripening, is signaled by berry softening and changes in berry color. Red and black cultivars start displaying those colors while in green cultivars, the green begins to fade to a lighter tone and the skin becomes translucent. Sugar content increases.
Canopy, Irrigation, and Disease Management
For the most part, grapevines should no longer be growing rampantly. Continue removing laterals from shoots and removing new growth from shortened shoots. Berries are at lower risk of powdery mildew infection now and temperatures are consistently high enough that the mildew fungus reproduces very slowly, so there is usually little to no need to spray.
As we move through August, start scaling back your grape irrigation but don’t stop watering. Table grapes need water to ripen clusters and support canopy health.
While powdery mildew management is less of an issue now than earlier in the season, rising sugar levels also mean some cultivars, especially tight-clustered ones, are at increasing risk of sour rot. Monitor your clusters for berry splitting, fruit flies, oozing juice, and/or a vinegar odor. Remove affected clusters and make a note of these cultivars to improve canopy, cluster thinning, and powdery mildew management next year. Removing affected clusters right away reduces disease-causing organisms and breeding habitat for fruit flies.
Harvest
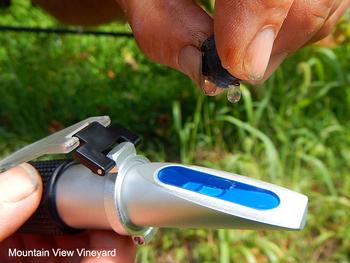
Grapes are non-climacteric, which means they don't continue to ripen after they are picked. They may get softer, but they won't get sweeter. So, it's important for the grower to decide when they are at their peak of ripeness and ready to be picked. The home grower usually does this by tasting, but commercial growers often check for ripeness by sampling and pressing berries from multiple vines, mixing the juice, and performing Brix tests on a small sample. Brix testing involves a simple device called a refractometer that measures how light direction changes as it passes through a liquid. Degrees brix is a simple indicator of the amount of sugar in the juice. Tables grapes are generally harvested at between 19 and 25 degrees brix, depending on the cultivar. One degree brix equals one gram of sugar per 100 grams of grape juice.
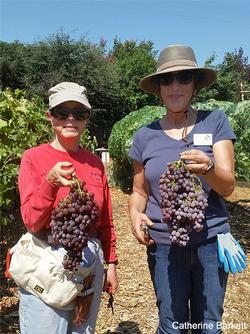
Once your table grapes are ripe, just snip them off with clippers.
You may see the occasional spider emerging from your clusters after harvest. Common species in Sacramento home vineyards are the bold jumping spider, Phiddipus audax, and the crab spider, Misumenia vatia.
Grape clusters become attractive habitats for spiders looking for an easy meal. Spiders are beneficial predators. If you’re concerned about potentially bringing them into your home, gently shake out clusters after picking. And when ready to use refrigerated clusters, place them outside in a container of water for a few minutes. This encourages any spiders lurking there to find another home
Now what to do with all those grapes?Grapes are fragile. They soften in the heat, shrivel in the sun, and are easily damaged by rough handling and pests. Fresh grapes last longest when stored at about 30-32 degrees F and 90-95 percent relative humidity. To ensure their longevity in the refrigerator, store them unwashed in a perforated plastic bag away from onions and other strongly flavored foods, and wash just before using. To enjoy them year-round, freeze them, dry them into raisins (on the vine, in the dehydrator, or oven), or preserve them as juice, jams or jellies. For more help on what to do with an abundance of grapes, visit:
UC Master Food Preserver Video Library
With the exception of 2020, on the first Saturday in August, the UCCE Sacramento County Master Gardeners host Harvest Day at the Fair Oaks Horticulture Center. We have activities and expert advice in all areas of the Horticulture Center: water efficient landscaping, herbs, orchard, berries, composting, vegetables, and the vineyard. We have a variety of speakers, activities, gardening-related booths, and food vendors! We hope to see you there in 2021!
September and October
Ongoing tasks
Continue protecting grapes from pests, and harvest as grapes become ripe. Refer back to our August entry for suggestions about netting grapes and links to information on preserving grapes. Monitor water needs by checking the moisture in the soil. Vine water needs continue to drop through September and October, but don't let the soil become dry. If you netted your vines, check for holes and repair them before removing and storing nets. It is easiest to make repairs when nets are stretched over the vines.
Fall Changes in Leaf Color
In fall, leaves and shoots recycle their nutrients back into the trunk and roots to store them for the following year. Leaves turn yellow, dry up, and fall off the vine. Assuming you are watering adequately, this change of leaf color from green to yellow is normal. Other colors, or unusual patterns on leaves, are not, especially if present in high numbers.
If you see many leaves with odd colors, take pictures and note the cultivar and date. Oddly colored leaves can be a sign of nutritional deficiencies or disease. However, it is difficult to diagnose problems by sight alone as abnormal leaf coloration can have multiple, unrelated causes. Sometimes, the problem can be quite difficult to diagnose.
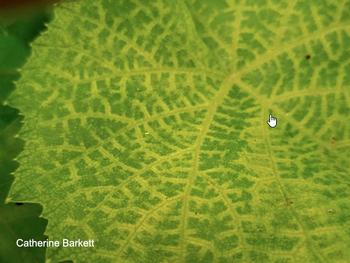
The picture below shows veinal chlorosis (lack of chlorophyll in the veins) on a well-fertilized, potted grape plant. Veinal chlorosis can be caused by a lack of iron, magnesium, or other nutrients, insecticide or herbicide damage, disease, or physical injury. We suspect in this case that it was caused by unusually alkaline (pH 9) irrigation water, which affected the young vine's ability to take up nutrients from the soil. When irrigation water returned to normal pH levels (grapes prefer pH 5.5 - 6.5), the chlorosis disappeared.
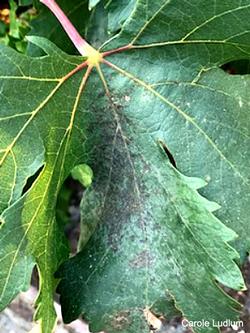
Black scarring and yellow blotching indicate powdery mildew infection. If abundant, take note for better mildew control next season.
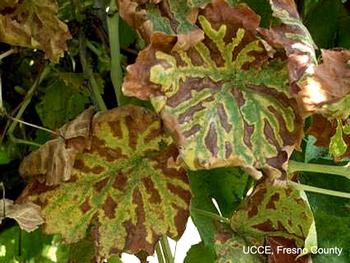
Brown spotting with distinct borders, called “tiger striping”, is characteristic of a canker disease called Esca. Infected vines probably need to be removed as the disease is incurable.
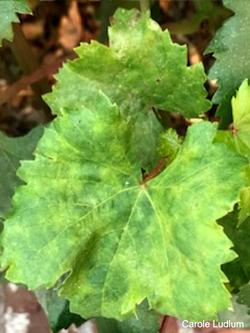
Red leaves, red leaf margins, and red spots on leaves can also be caused by many factors, including diseases, nutrient deficiencies, damage to the root system, or stress caused by temperature extremes.
Red leaf margins, possibly due to magnesium or potassium deficiency. Red spotting on the leaves of a Black Emerald, cause unknown but probably nutritional.
Causes of leaf discoloration can occur simultaneously in a vine, i.e., a vine might have both a nutritional deficiency and a disease! That is why it is important, if the problem persists across seasons, to perform testing. Soil and tissue tests (leaf or petiole, which is the stem attaching a leaf to the vine) are preferred methods of diagnosing nutritional problems. See more information about
How and when to do soil or plant tissue testing
Although it might be tempting to clean dying leaves and shoots off your vine, do not prune in the fall or early winter. Wait until late February or early March, when the vines begin to grow again and can heal pruning wounds more quickly.
November and December
The vines are dormant. Minimal maintenance is needed in the vineyard.
Check to see if the vines have adequate moisture (winter rain usually
takes care of this), remove weeds, mulch and check for damage to the
vines from storms.
Since the leaves have dropped, now Is a good time to plan for spring
pruning
Enjoy the holidays and resume vineyard care in January!


